How is Toilet Flange Attached to Pipe in Simple Steps?

Time:2026-03-18 Author:Sienna
0%

Installing a toilet flange correctly can save homeowners from significant plumbing issues. According to a report by the Plumbing and Drainage Institute, improper installations can lead to costly leaks, affecting approximately 30% of households annually. Understanding "how is toilet flange attached to pipe" is essential in preventing these problems.

Expert plumber John Smoot emphasizes, “A strong connection at the flange ensures lasting performance.” This highlights the importance of the flange's role in maintaining the toilet's stability. Each installation involves using the right materials, and attention to detail is crucial. For instance, ensuring that the flange is level can prevent future leaks.

Homeowners often overlook these steps. Many assume that installation is straightforward, but it requires precision. A poorly attached flange can cause wobbling and leaks, which may go unnoticed until damage occurs. A careful approach is critical when learning how to properly attach the flange to the pipe.

How is Toilet Flange Attached to Pipe in Simple Steps?

Understanding the Toilet Flange and Its Function

The toilet flange serves a critical purpose in bathroom plumbing systems. It connects the toilet base to the floor and links the drainage pipe. A well-installed flange ensures that the toilet remains stable and prevents leaks. According to industry reports, improper installation may lead to significant water damage and costly repairs.

When attaching the flange, proper alignment is essential. The center of the flange should align with the drainage pipe. Many DIYers overlook the importance of this step. A misaligned flange can cause a poor seal. This results in leaks and odors.

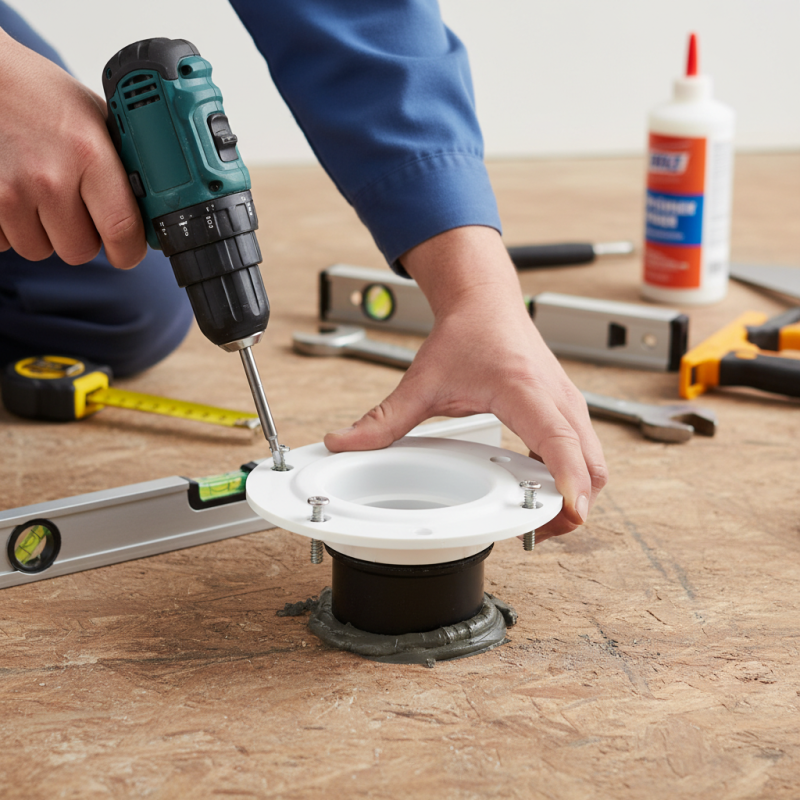
Tip: Always check for levelness with a spirit level.

Using the right materials is crucial. Most flanges are made from PVC or metal. Both materials have their pros and cons. PVC is lightweight and resistant to corrosion. Metal, however, can offer greater durability. Some homeowners experiment with alternatives but often regret it later. The simplest option may not always be the most effective. Water supply lines also require attention during installation.

Tip: Keep extra bolts and washers on hand for any adjustments needed later.

Paying attention to these details is vital. Ignoring small aspects can turn into large problems down the line. A reliable flange installation can make a noticeable difference. For a stable toilet, every step matters.

Tools Needed for Attaching a Toilet Flange

When attaching a toilet flange, having the right tools is essential. You will need a drill, screws, a wrench, and a level. A putty knife for cleaning surfaces can also be helpful. Make sure your workspace is clear. This will help you focus on the task at hand. Measure the waste pipe carefully to ensure a snug fit for your flange.

Tips: Always wear safety goggles when using power tools. This will protect your eyes from debris. Don’t rush the process; take your time to align the flange correctly. A misalignment can lead to leaks later.

Once you gather your tools, start by cleaning the area around the pipe. Use a putty knife to scrape away old wax residue or any debris. Then, position the flange over the pipe. Check for levelness using the level tool. If it’s tilted, adjust accordingly to avoid future issues with the toilet installation. After that, secure the flange with screws, but avoid overtightening them to prevent damage.

Step-by-Step Guide to Installing a Toilet Flange

Installing a toilet flange may seem daunting, but it can be accomplished in a few clear steps. According to industry reports, about 30% of plumbing-related issues stem from improper flange installation. This highlights how crucial it is to get it right. Begin by ensuring you have the right type of flange for your toilet and floor. An improper match may lead to leaks or instability.

Next, secure the flange to the existing pipe. Most flanges come with pre-drilled holes. Use a drill to properly anchor it to the floor. The flange must be level and solidly attached. A poorly aligned flange can cause serious issues, such as shifting and unstable toilets. Remember to use wax or rubber seals for a reliable connection. Studies show that a proper seal can prevent up to 80% of leaking problems long-term.

After installing, check for any movement. If the flange feels loose, double-check your work. Sometimes, the flange might need shims for leveling. A simple oversight here can lead to future complications. Always take time to ensure every detail is correct.

Common Mistakes to Avoid When Installing a Toilet Flange

Installing a toilet flange might seem straightforward, but mistakes can lead to significant problems. One common mistake is neglecting to check the existing pipe alignment. If the flange isn't level or aligned with the drain pipe, you'll face leaks and instability. Always ensure it fits snugly onto the pipe without gaps.

Another frequent issue arises from over-tightening screws. Many think that a tighter fit guarantees security, but too much pressure can crack the flange. Use just enough pressure to secure it without compromising the material. It's essential to find that balance. Additionally, remember to use the right type of wax ring. A cheap wax ring can crumble over time, leading to leaks. Take your time to choose the best option.

Maintenance Tips for a Secure Toilet Flange Connection

When installing a toilet flange, ensuring a secure connection is crucial. Start by checking the condition of the pipe. A damaged pipe can lead to leaks. Use a wax ring for better sealing; it must fit tightly around the flange. Align the flange holes with the screws positioned in the floor. Ensure everything sits level before tightening. Over-tightening can crack the flange or the toilet base.

Regular maintenance plays a vital role. Periodically inspect for leaks around the flange. Even small drips can degrade materials over time. If you notice any dampness, act quickly. Tighten screws as necessary, but avoid excess force. Consider replacing the wax ring every few years. This will help maintain a strong seal and prevent odors.

Toilet flanges may need adjustments when flooring changes. New tiles can raise the height, affecting the connection. Always account for this before installation. Consulting how the flange sits against the floor is essential. Balancing form and function is necessary. Take your time. This process can lead to long-term success.

FAQS

: What is the purpose of a toilet flange?

: The toilet flange connects the toilet base to the floor and the drainage pipe.

Why is proper alignment important when installing a flange?

Proper alignment ensures a good seal and prevents leaks and odors.

What materials are toilet flanges usually made from?

Toilet flanges are typically made from PVC or metal, each with pros and cons.

What tools do I need to install a toilet flange?

You will need a drill, screws, a wrench, a level, and a putty knife.

How can I ensure a secure toilet flange connection?

Check the pipe's condition, use a wax ring, and ensure everything is level before tightening.

What maintenance should I perform on a toilet flange?

Regularly inspect for leaks and consider replacing the wax ring every few years.

What can happen if I ignore small issues with the flange?

Ignoring small issues can lead to larger problems like water damage and costly repairs.

Should I overtighten the flange screws?

No, overtightening can crack the flange or toilet base, causing further issues.

How does flooring affect toilet flange installation?

New flooring can change the height, possibly affecting the flange's connection to the floor.

What should I do if I notice dampness around the flange?

Act quickly to tighten screws or replace the wax ring to prevent further damage.

Conclusion

In the article "How is Toilet Flange Attached to Pipe in Simple Steps?", readers are guided through the essential aspects of toilet flange installation. The toilet flange is a crucial component that connects the toilet to the sewage pipe, ensuring a secure and leak-proof fit. To successfully attach a toilet flange, a list of necessary tools is provided, making the process straightforward for DIY enthusiasts.

The step-by-step guide covers everything from preparing the area to securing the flange properly. It also highlights common mistakes to avoid, ensuring a hassle-free installation. Additionally, maintenance tips are shared to help keep the toilet flange connection secure over time. Overall, this resource offers valuable insights on how is toilet flange attached to pipe, simplifying the installation process for homeowners.

Sienna

Sienna

Sienna is a skilled marketing professional with a deep expertise in our company’s core products and services. With a passion for innovation and detail, she plays a pivotal role in crafting insightful blog posts that not only highlight the unique features of our offerings but also provide valuable......