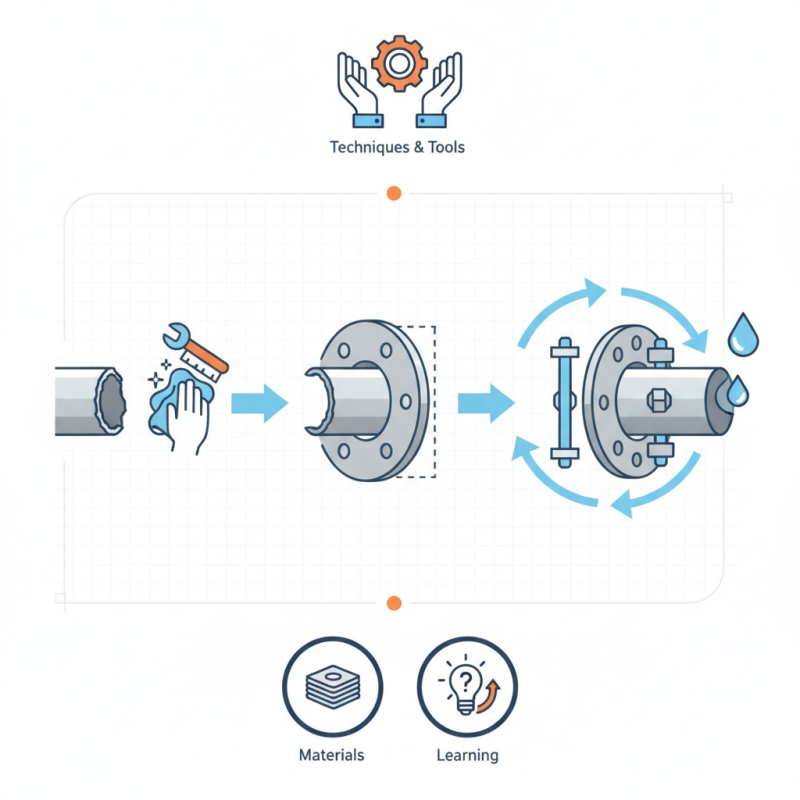
Fitting a flange on a pipe might seem daunting for beginners. However, with the right techniques and tools, it can become a straightforward task. Understanding how to fit a flange on a pipe is essential for ensuring a secure and leak-proof joint. Properly installed flanges provide strength and reliability to various piping systems.
Many factors can affect the fitting process, such as the type of flange and pipe material. It is crucial to select compatible components for optimal results. Additionally, preparation is key. Ensure that both the flange and pipe surfaces are clean and free from debris. This attention to detail can prevent issues down the line, such as leaks or failures.
Mistakes are part of learning, and it’s important to address them. For instance, not aligning the flange correctly can lead to significant complications. Reflecting on past experiences helps refine techniques for the future. Navigating this process successfully requires a blend of knowledge, practical skills, and a willingness to learn from challenges.
Flanges are critical components in piping systems. They provide a strong connection between pipes, valves, and other equipment. Commonly made from metal or plastic, flanges allow for secure and leak-proof joins. Each type of flange suits different applications and environments, ensuring compatibility with various fluids and pressures.
Understanding the material properties and design of flanges is essential. For example, a blind flange is used to seal the end of a pipe. This type of flange does not have any holes. It is vital in maintaining pressure within the system. However, improper selection can lead to leaks or fractures. Engineers must assess environmental factors like temperature and pressure before making a choice.
The installation process can seem straightforward. However, challenges may arise. Misalignment during attachment can weaken the joint. Insufficient tightening of bolts may result in leaks under high pressure. Observing manufacturer guidelines is key, yet real-life conditions can vary. Experience in the field helps to refine techniques over time. Understanding the nuances of flanges and their applications can greatly enhance the longevity of piping systems.
Fitting a flange on a pipe requires a few essential tools and materials. First, ensure you have the correct flange type for your pipe. A compatible gasket is crucial to create a leak-proof seal. You’ll need a torque wrench to achieve the precise tightness. Choose one that suits your flange size.
Have a pipe cutter on hand for precise cuts. A measuring tape is essential for accurate alignment. Safety goggles should be worn during the fitting process to protect your eyes. Gloves are also recommended to prevent injuries from sharp edges.
Keep in mind that not every fitting goes smoothly. Sometimes, the flange may not align perfectly with the pipe. In such cases, a pipe bender or heat source might be necessary to adjust the pipe’s angle. Be ready to reflect on what went wrong and how to improve your technique for future fittings. Remember, practice makes perfect.
Preparing a pipe for flange installation requires careful attention to detail. Start by measuring the pipe diameter accurately. Use calipers for precision. Mark the spots where you will attach the flange. This helps ensure that everything aligns properly. Clean the pipe surface thoroughly. Any rust or dirt can compromise the seal.
Next, consider the type of flange you'll use. Different applications may require different flanges. Ensure the flange matches the pipe specifications. Use a pipe cutter or saw to trim the pipe if necessary. Take your time to achieve a clean cut. A jagged edge may lead to leaks.
Lastly, deburr the edges of the cut. This step often gets overlooked. Sharp edges can damage the gasket during installation. Use a file or deburring tool to smooth the edges. Check for any irregularities again. Flange installation requires precision. Missing small details can lead to frustrating setbacks later.
| Step | Task Description | Tools Required | Expected Duration |
|---|---|---|---|
| 1 | Prepare the Pipe Surface | Wire Brush, Cleaning Agent | 15 minutes |
| 2 | Align the Flange | Measuring Tape, Level | 10 minutes |
| 3 | Drill Bolt Holes | Drill, Drill Bit | 20 minutes |
| 4 | Install the Flange | Flange, Bolts, Gasket | 15 minutes |
| 5 | Tighten Bolts | Torque Wrench | 10 minutes |
| 6 | Inspect the Installation | Inspection Tools | 5 minutes |
Aligning and attaching a flange securely to a pipe requires careful techniques. One common method is using a flange alignment tool. This tool reduces the chances of misalignment. It is important to center the flange accurately before tightening any bolts. Often, a visual inspection helps identify any gaps.
When attaching the flange, apply the right torque to each bolt. Over-tightening can lead to damage, while under-tightening may cause leaks. A star pattern is advisable for tightening. This technique ensures even distribution of pressure across the flange.
Reflection is key in this process. Newcomers often overlook the importance of cleaning surfaces before installation. Debris can affect the seal. Additionally, double-checking measurements can save time and prevent frustration later. Ensuring proper alignment will lead to a more durable connection.
Fitting a flange on a pipe seems straightforward, but many common mistakes can lead to significant issues. One key mistake is not properly aligning the flange to the pipe. Misalignment can cause leaks or even catastrophic failures. According to industry reports, improper alignment contributes to approximately 30% of piping system failures. Tools like laser alignment systems can help ensure precision, reducing chances of error.
Another frequent error involves overtightening the bolts. Many believe that more torque equals better sealing, but this is misleading. Over-tightened bolts can lead to flange deformation or even material fatigue. Surveys indicate that nearly 25% of maintenance professionals have experienced issues due to incorrect torque settings. Following the manufacturer's specifications is crucial for reliability.
Additionally, neglecting to clean the surfaces before installation can be detrimental. Dirt or debris can compromise the integrity of the seal. It's suggested that operators visually inspect and clean both flanges and pipe ends thoroughly. Industry standards emphasize the importance of a clean interface to prevent leaks and ensure long-term performance.
: You need a torque wrench, pipe cutter, measuring tape, safety goggles, and gloves.
Use a compatible gasket with your flange to create a secure seal.
Accurate measurement ensures the flange aligns properly and fits correctly.
Consider using a pipe bender or heat source to adjust the pipe’s angle.
Rust or dirt can compromise the gasket and lead to leaks during installation.
Always deburr the edges to prevent damage to the gasket and ensure a proper seal.
Take your time with a pipe cutter or saw to avoid jagged edges.
Overlooking details like cleaning or measuring can lead to frustrating setbacks.
Reflect on past installations and practice regularly to enhance your skills.
No, safety goggles and gloves are vital to protect against injuries during installation.
In the article "How to Fit a Flange on a Pipe Easily and Effectively," readers will gain a comprehensive understanding of flanges and their vital role in piping systems. The article outlines the essential tools and materials required for flange fitting, ensuring that readers are well-prepared for the installation process.
A step-by-step guide is provided to prepare the pipe for flange installation, focusing on techniques for aligning and securely attaching the flange. Additionally, the article highlights common mistakes to avoid, enhancing the overall effectiveness of the fitting process. By following this guide, readers will learn how to fit a flange on a pipe successfully, leading to reliable connections in their piping applications.
EZ STEEL