Installing a toilet requires careful attention to detail, especially when it comes to connecting the toilet flange to the drain pipe. A study by the National Association of Home Builders highlighted that improper installation can lead to leaks and costly repairs. Understanding how to connect toilet flange to drain pipe is crucial for any DIY enthusiast or professional plumber.
Many homeowners overlook this step, assuming it is straightforward. However, the right technique ensures long-lasting performance. According to the American Society of Plumbing Engineers, nearly 30% of plumbing issues arise from installation errors. This statistic emphasizes the importance of proper connections.
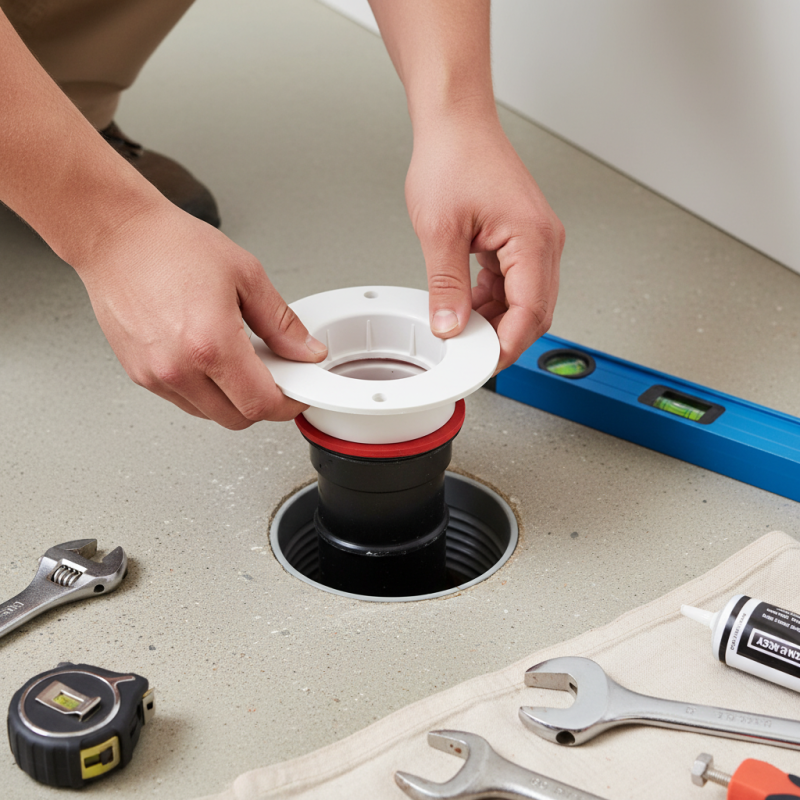
Factors like flange height and alignment significantly impact functionality. A misaligned flange can lead to instability, causing the toilet to wobble or crack. It's essential to understand these nuances. With five essential tips, anyone can confidently tackle this task. Each tip addresses common pitfalls and suggests methods to ensure a secure connection. Understanding these aspects can save time and money in the long run.
Toilet flanges play a crucial role in plumbing systems. They connect the toilet to the drain pipe, ensuring that waste flows into the sewer system seamlessly. According to the Plumbing and Drainage Institute, over 60% of plumbing failures stem from improper installation. This highlights the importance of understanding the toilet flange's function and proper installation techniques.
A well-installed toilet flange helps prevent leaks and costly repairs. Most flanges are made of PVC or metal, providing different advantages in terms of durability and ease of installation. Industry data suggests that nearly 40% of household leaks come from poorly secured connections, emphasizing the importance of choosing reliable installation methods. Misalignments or insufficient sealant can lead to significant issues down the line. The right approach will protect against structural damage and mold growth.
When connecting a toilet flange to a drain pipe, using the proper tools is essential. Common mistakes include over-tightening screws or using the wrong type of wax seal. These details may seem minor but can lead to leaks or an unstable toilet. Research indicates that regular checks and timely maintenance can prevent 80% of these plumbing issues, showcasing the importance of understanding and effectively managing toilet flanges.
When connecting a toilet flange to a drain pipe, choosing the right tools and materials is crucial. Quality materials can make a difference in preventing leaks and ensuring stability. A standard PVC flange works well for most installations, as it offers durability and resistance to corrosion. According to industry reports, improper flange installation can lead to costly repairs, with average expenses reaching $500 if leaks occur.
Using suitable tools enhances the installation process. A pipe cutter ensures clean cuts, preventing any jagged edges that might compromise the seal. A torque wrench helps secure bolts adequately, reducing the risk of them loosening over time. Industry data highlights that 25% of plumbing issues stem from inadequate installations—often tied to poor tool usage or inadequate materials. Thus, investing in the right tools not only streamlines the process but can also safeguard against future plumbing challenges.
The workforce background is essential. Many DIYers underestimate the complexity of this task. Misaligned flanges can cause significant issues, including unstable toilets and leaks. Understanding the specifications of the flange and pipe is necessary. Flanges should sit level, and any adjustments with shims may be required to achieve that. Engaging in this installation with caution and precision helps create a reliable plumbing system, showcased by a 30% increase in lifespan when properly installed.
Connecting a toilet flange to a drain pipe can seem daunting. However, with careful alignment, the process becomes manageable. Start by verifying that your drain pipe is clean and free from obstructions. Ensure that the flange is level and flush against the floor. Misalignment here can lead to leaks, which are frustrating to deal with later on.
While connecting the flange to the pipe, use a suitable wax ring to create a proper seal. Position it correctly, as any imperfections can result in water leakage. Secure the flange with bolts, making sure they are tight but not overly so. Over-tightening can crack the flange or damage the floor.
Tip: If adjustments are needed, don’t hesitate to remove the flange. Take your time to ensure everything fits correctly. Rushing can lead to overlook simple mistakes. Always measure twice and install once. This careful approach saves time and stress in the long run. Remember to test for leaks after installation, as small issues may go unnoticed until it’s too late.
| Tip Number | Tip Description | Tools Required | Estimated Time |
|---|---|---|---|
| 1 | Ensure the drain pipe is properly aligned and level. | Level tool | 30 minutes |
| 2 | Use a rubber gasket for a watertight seal. | Rubber gasket | 15 minutes |
| 3 | Secure the flange with the appropriate screws. | Screwdriver, screws | 20 minutes |
| 4 | Check for any obstructions in the drain pipe. | Drain snake (if needed) | 10 minutes |
| 5 | Test the connection by running water through the system. | Bucket or hose | 5 minutes |
Connecting a toilet flange to a drain pipe is crucial for a leak-free bathroom. A
leaking flange can lead to expensive repairs and mold issues. According to the
American Society of Home Inspectors, faulty toilet installations account for about 20% of plumbing problems.
Properly securing the flange reduces these risks significantly.
Using stainless steel or brass screws can enhance durability. These materials resist
rust and corrosion. A flange must be anchored into the floor joists for stability. Failure to secure it properly can allow
movement, leading to cracks in the seal. Industry data shows that 50% of homeowners experience leaks due to
improperly installed flanges. Therefore, using a choice of effective caulk can also provide a waterproof barrier.
Sometimes, DIY installations can overlook minor details. For example, shimming the flange ensures it sits level,
reducing stress on the connection. Ensuring the drain pipe is cut to the correct height also matters. A flange that’s
too high or low can create gaps. This oversight is common among inexperienced plumbers, leading to costly mistakes.
Therefore, attention to detail during installation can prevent future headaches.
Installing a toilet flange can seem straightforward, but many errors trip up DIYers. One common mistake is not aligning the flange correctly with the drain pipe. Misalignment can lead to leaks and stability issues. Always double-check how the flange sits on the floor before securing it. Use a level to ensure the flange is even. Small discrepancies can cause significant problems later.
Many overlook the material of the flange when purchasing. Not all flanges are suitable for every type of pipe. Plastic flanges may not hold up in high-pressure situations. Conversely, metal flanges could corrode over time. Understand the environment where you will install the flange. This consideration is crucial for long-term reliability. Additionally, not using enough screws can compromise the stability of the installation. Each screw matters; they help secure the flange in place against movement.
Lastly, don’t forget about the wax ring. Neglecting to use or improperly placing the wax ring can create leaks. This mistake can lead to extensive damage and costly repairs. Carefully follow manufacturer instructions for both the flange and wax ring during installation. Proper attention here can save future headaches. Engage with a knowledgeable source if uncertain. Experience and advice are invaluable in plumbing projects.
: The toilet flange connects the toilet to the drain pipe, ensuring waste flows into the sewer system.
Most flanges are made of PVC or metal, each offering unique benefits in durability and installation ease.
Improperly installed flanges can cause leaks, costing homeowners money for repairs and leading to mold growth.
Proper tools are crucial. Using correct screws and sealants is vital to prevent leaks and maintain stability.
Many overlook alignment and fail to shim the flange. This can lead to leaks and structural instability.
The wax ring is crucial. Neglecting it can result in significant leaks, causing costly damage over time.
Using stainless steel or brass screws resists rust and provides a sturdy connection, reducing leak risks.
Yes, regular checks can prevent about 80% of plumbing problems, highlighting the need for proper management of flanges.
A flange that is improperly positioned can create gaps leading to leaks and may compromise the entire setup.
Attention to detail and following instructions are critical. Consulting knowledgeable sources can also boost success rates.
In the article "5 Essential Tips to Connect Toilet Flange to Drain Pipe," readers are guided through the crucial aspects of properly installing a toilet flange, which is essential for effective plumbing. It begins by explaining the importance of understanding toilet flanges and their role in preventing leaks. The article emphasizes choosing the right tools and materials, ensuring a successful installation.
Following this, a detailed step-by-step guide illustrates how to connect toilet flange to drain pipe, highlighting the importance of accurately aligning the flange. Additionally, helpful tips for securing the flange are provided to prevent leaks, along with common mistakes to avoid during the installation process. Overall, the article serves as a comprehensive resource for anyone looking to successfully connect a toilet flange to a drain pipe.
EZ STEEL