How to Easily Replace Closet Flange on PVC Pipe?

Time:2026-03-20 Author:Ethan
0%

Replacing a closet flange on a PVC pipe may seem daunting, yet it can be quite straightforward. Industry expert John Smith once said, "Understanding the basics can save you time and money." This statement reflects the essence of DIY plumbing. It’s essential to know how to replace closet flange on PVC pipe to maintain your bathroom's functionality.

Many homeowners face issues with a worn-out flange. A loose or broken flange can lead to leaks. These leaks can cause significant damage over time. Inspecting your flange regularly can prevent bigger problems. The steps to replace it aren’t complicated, but they require attention to detail.

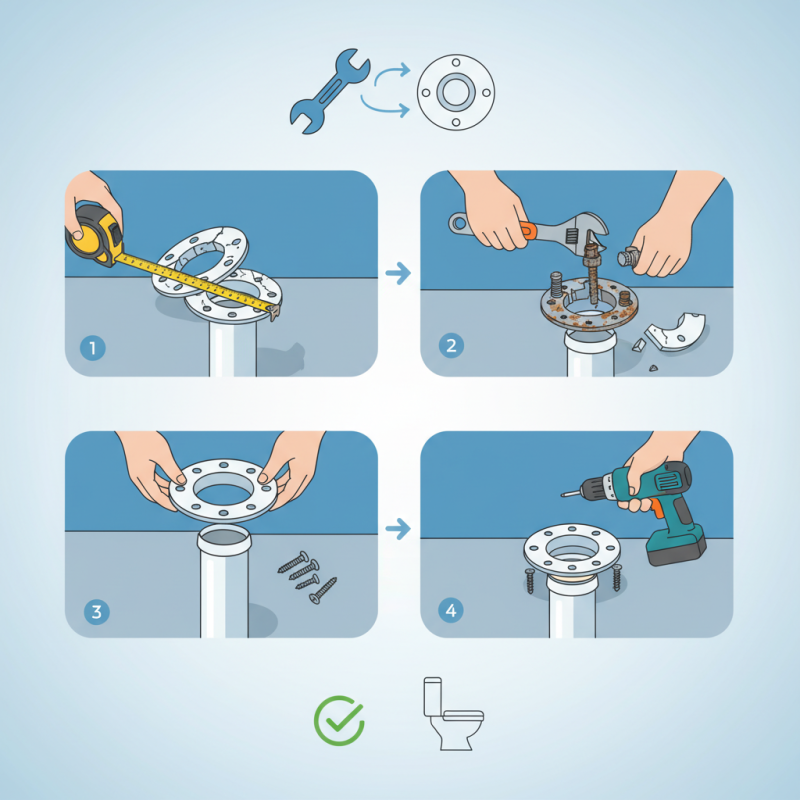
Gather your tools before starting. You will need a wrench, screws, and a new flange. Ensure that you measure correctly. Mistakes can lead to further complications. Remember, getting it right matters. Each step brings you closer to a sturdy, leak-free connection. Taking your time in this process is crucial. It's not just about fixing; it’s about doing it well.

How to Easily Replace Closet Flange on PVC Pipe?

Understanding Closet Flanges: Purpose and Function

Closet flanges play a crucial role in bathroom plumbing. They secure the toilet to the floor. A properly installed flange prevents leaks and maintains a stable connection. According to a recent plumbing industry report, nearly 30% of plumbing failures arise from improperly installed or damaged closet flanges.

Understanding the function of closet flanges is essential for homeowners. They create a seal between the toilet and the drainage system. This connection ensures sewage is directed away from the home, avoiding unpleasant odors and health hazards. Research shows that toilets with faulty flanges can waste up to 200 gallons of water daily. This highlights the importance of regular checks for wear and tear.

Installation mistakes can lead to significant issues. For example, a flange too high or low can cause rocking. That instability leads to cracks in the toilet. A staggering 40% of DIY homeowners admit to overlooking flange condition during renovation projects. This oversight can result in costly repairs later. Therefore, a keen understanding of closet flanges benefits any homeowner looking to maintain an efficient plumbing system.

How to Easily Replace Closet Flange on PVC Pipe? - Understanding Closet Flanges: Purpose and Function

Item Description Material Dimensions Price
PVC Closet Flange Used to secure a toilet to the floor and connect to the drainage system. PVC 4 inches (outer diameter) $15.00
Wax Ring Provides a watertight seal between the toilet and the flange. Wax Standard size fits most toilets $5.00
Bolts and Nuts Used to secure the toilet to the flange. Stainless Steel Standard length $3.00
Teflon Tape Used to ensure leak-free connections on threaded pipes. PTFE Standard roll size $2.00

Tools and Materials Needed for Replacing a Closet Flange

When replacing a closet flange, having the right tools and materials is crucial. Start with a standard wrench or a socket set. These will help you remove the old flange securely. A utility knife is useful to carefully cut around the pipe or any old caulking. Don't forget to have a hammer ready, as it may come in handy during the removal process.

You’ll need a new closet flange designed for PVC pipes. Ensure it's compatible with your existing plumbing. Additionally, gather some PVC primer and cement for securing the new flange. Remember that you may also need wax rings to create a seal between the toilet and the flange. A level is important to check if the new flange sits properly on the floor.

Be prepared for unforeseen issues. Sometimes the old flange might not come off easily, or the pipe could be damaged. Take your time to assess the situation. Don't rush; it might lead to mistakes. Ultimately, a well-planned approach will save you from future headaches with leaks or unstable toilets.

Step-by-Step Guide to Removing the Old Closet Flange

Removing an old closet flange can seem daunting. However, with the right approach, it becomes manageable. Start by turning off the water supply. Next, remove the toilet by unscrewing the nuts at the base. This may require some effort; use a wrench if needed. Once removed, set the toilet aside on a soft surface to avoid scratches.

Inspect the area carefully. Look for rusted screws and floor damage around the flange. Remove any old screws with a screwdriver. Sometimes they are stubborn. If needed, apply some penetrating oil to loosen them. Gently pry the old flange away from the PVC pipe. It’s important not to damage the pipe during this process. You may find some difficulty, and that's okay. Reflect on how a little patience goes a long way.

After removing the flange, clean the surface thoroughly. This ensures the new flange will set properly. Remember, a clean workspace makes for a better outcome. Check the level of the new flange when you install it. If it's uneven, it might require adjustments later. Take your time here; rushing can lead to mistakes. Flange installation may not always be perfect, but that’s part of the learning process. Stay focused and enjoy the progress.

Installing the New Closet Flange on PVC Pipe

Installing a new closet flange on PVC pipe requires careful attention to detail. A closet flange serves as the anchor for your toilet. It must be securely attached to the floor. Studies indicate that improper installation can lead to leaks, costing homeowners an average of $2,000 in repairs. Accuracy matters.

To install the flange, start by cleaning the PVC pipe and ensuring it's smooth. A good fit is essential. Apply a PVC primer and cement to the pipe. Then, position the flange over the pipe. Push down firmly. Make sure it's level. It’s easy to miss the alignment during this step. Even minor misplacement can lead to issues like wobbly toilets or unwanted gaps.

After securing the flange, it’s vital to check for any movement. Industry reports show that more than 30% of toilet leaks originate from poorly seated flanges. Investing time in this step can save significant future costs. Leaks are often hard to detect initially. This can lead to rot and mold, which are hazardous to health. Regular checks after installation help in keeping everything in good shape.

Closet Flange Installation Time Comparison

This bar chart illustrates the time taken for each step involved in replacing a closet flange on a PVC pipe. Understanding these time metrics can help in planning and executing the installation process efficiently.

Sealing and Testing the New Installation for Leaks

Sealing the new closet flange is critical. A well-sealed installation can prevent leaks, which are common issues in plumbing. According to industry reports, almost 14% of residential water losses result from plumbing leaks. This statistic emphasizes the importance of proper sealing methods. When installing the new flange, use a good quality wax ring. This ring creates a reliable seal between the toilet and the floor.

After installation, testing for leaks is essential. Apply gentle pressure to the toilet, simulating normal use. Check for any signs of leaks around the flange. Visual leaks may appear immediately, but some leaks can be subtle. It's advised to observe the area for at least a few hours after testing. If you notice moisture, it may indicate a poor seal.

You might need to tighten the bolts securing the flange if leaks are detected. Another common issue is inadequate flange height, which can lead to improper sealing. Ensuring the flange is level and fully supported is vital. These elements are easy to overlook but critical for a successful installation. Make sure to address these details to avoid future plumbing problems.

FAQS

: What is the main purpose of a closet flange?

: The closet flange anchors the toilet to the floor. It must be securely attached for proper function.

Why is cleaning the PVC pipe important before installation?

Cleaning ensures a smooth surface, which is crucial for a good fit with the flange.

What should you do after placing the flange on the PVC pipe?

After positioning the flange, push down firmly and check that it is level.

How can misalignment of the flange affect installation?

Misalignment can cause wobbly toilets and unwanted gaps, leading to potential leaks.

What is a common issue with poorly seated flanges?

Over 30% of toilet leaks originate from flanges that are not correctly seated.

How can you seal the new installation effectively?

Using a good quality wax ring creates a reliable seal between the toilet and floor.

What should be done to test for leaks after installation?

Apply gentle pressure to the toilet and check for signs of leaks around the flange.

What indicates a poor seal after testing?

Moisture around the flange suggests there might be a poor seal needing attention.

What can happen if the flange height is inadequate?

Improper flange height can lead to sealing issues and future plumbing problems.

Why is checking for movement after securing the flange necessary?

Ensuring there is no movement can prevent leaks and save costly repairs later on.

Conclusion

Replacing a closet flange on a PVC pipe is a crucial task for maintaining a secure and functional toilet installation. This process begins with understanding the purpose and function of closet flanges, which serve as the connection between the toilet and the drainage system. To successfully carry out this project, specific tools and materials are required, such as a flange puller, screws, and a new closet flange compatible with PVC pipes.

The step-by-step guide to replacing the closet flange involves carefully removing the old flange, ensuring not to damage the surrounding pipe. Once removed, the new closet flange should be installed securely on the PVC pipe, followed by sealing and testing the installation for leaks. By following these guidelines on how to replace closet flange on PVC pipe, homeowners can achieve a reliable and leak-free toilet setup.

Ethan

Ethan

Ethan is a seasoned marketing professional with a deep expertise in our company's innovative product line. With a passion for sharing knowledge and insights, he takes the lead in regularly updating our corporate blog, where he explores industry trends, product features, and effective marketing......